How to run TabPy as Windows Service

People ask this question in different ways:

  • How do I make TabPy to start automatically?
  • How can I run TabPy in background?
  • How can I run TabPy as if it was a service?

Answer to these questions are different depending on your OS and can even be different for different versions of the same OS.

In this post I am showing the simplest way to make TabPy something like a Windows service – which means it starts automatically and runs in background. For the following steps, I assume you have TabPy environment configured in Anaconda (read https://tabscifi.golovatyi.info/category/anaconda/ for more examples and how-to’s for using Anaconda with analytics extensions).

With my Anaconda I have tabpy_demo environment where TabPy package is installed:

Next, I created c:\demo\TabPy_as_a_service folder with the simple config file in it:

[TabPy]
TABPY_PORT = 9004
[loggers]
keys=root
[handlers]
keys=rootHandler
[formatters]
keys=rootFormatter
[logger_root]
level=DEBUG
handlers=rootHandler
qualname=root
propagete=0
[handler_rootHandler]
class=handlers.RotatingFileHandler
level=DEBUG
formatter=rootFormatter
args=('tabpy_log.log', 'a', 1000000, 5)
[formatter_rootFormatter]
format=%(asctime)s %(levelname)ss:%(lineno)d): %(message)s
datefmt=%Y-%m-%d,%H:%M:%S

For more information about custom TabPy config consider reading posts at https://tabscifi.golovatyi.info/category/tabpy-configuration/.

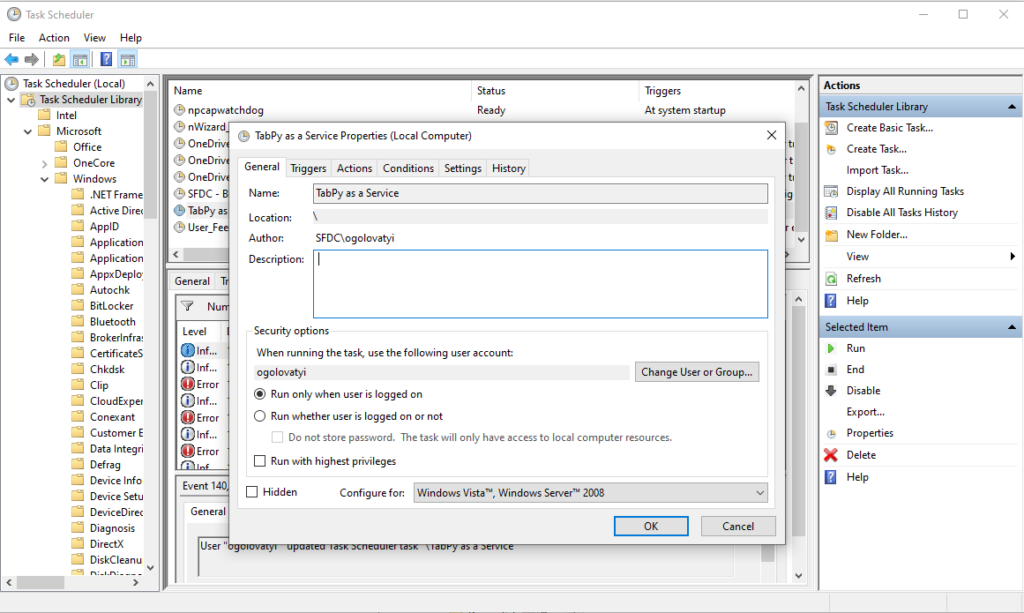
Now let’s create a task with Task Scheduler (Start->Task Scheduler). In Task Scheduler Library click Create Task… on Actions pane on the right. In the task dialog specify the task name (I use “TabPy as a Service” in this example), and choose if you want the task to run with specific account.

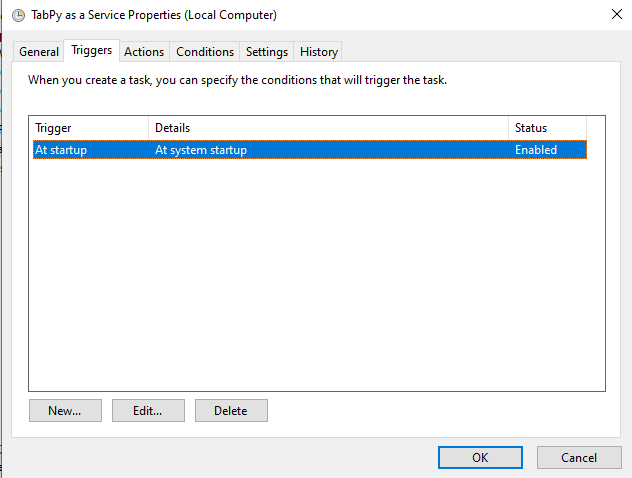
On Triggers tab click New… and specify At startup – now the task runs automatically at system startup.

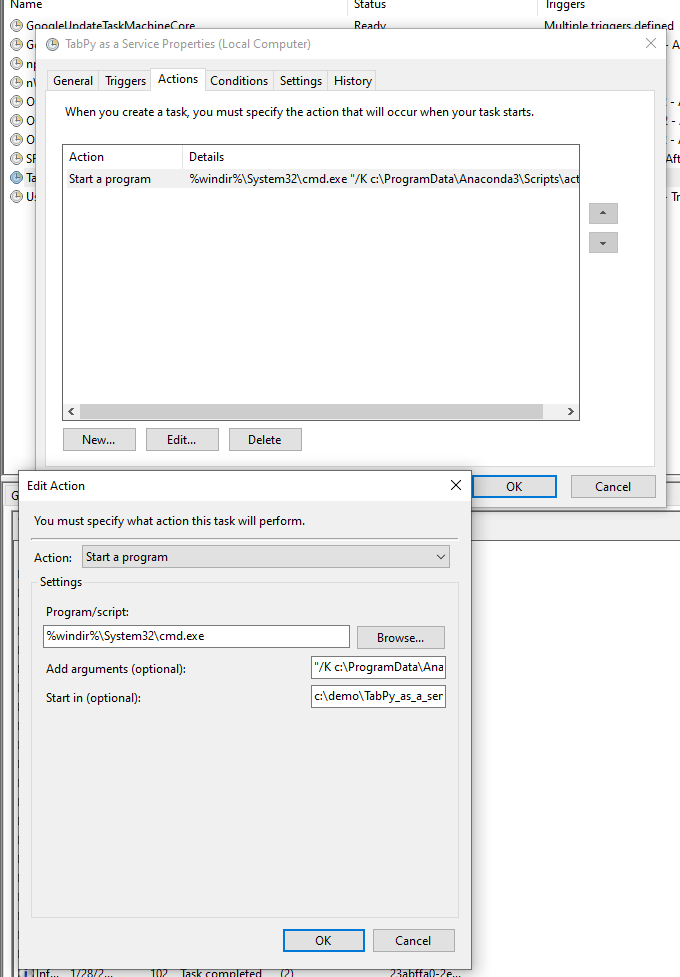
On Actions tab add new action Start a program and use the following parameters:

  • For Program/script use %windir%\System32\cmd.exe.
  • For arguments at Add arguments enter `”/K c:\ProgramData\Anaconda3\Scripts\activate.bat tabpy_demo && tabpy –config tabpy.conf”`. More about the string below.
  • For Start in specify folder you have your config file in. The same folder will have TabPy logs in my case.

The arguments string above means:

  • /K tells cmd to run the command and continue (documentation for cmd is here – https://docs.microsoft.com/en-us/windows-server/administration/windows-commands/cmd).
  • c:\ProgramData\Anaconda3\Scripts\activate.bat tabpy_demo activates Anaconda environment tabpy_demo. For you this part will be different: Anaconda can be installed in a different folder and TabPy environment will have a different name.
  • tabpy --config tabpy.conf starts TabPy with the custom configuration file in c:\demo\TabPy_as_a_service folder specifies as Start in folder.

On Conditions and Settings tabs change parameters as needed.

Now you can test the task – click Run action on Actions pane. If the task was configured properly you’ll see TabPy is running.

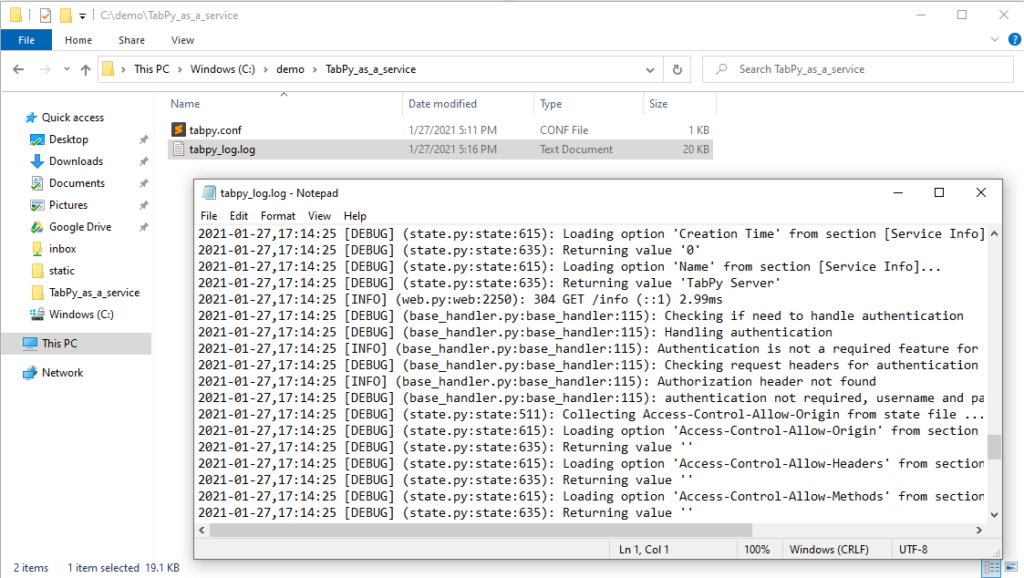
Log files for TabPy can be found in the same c:\demo\TabPy_as_a_service folder where config file is:

Now we have TabPy scheduled to start on a system start up.

One question remains – how can I make cmd window go away? It is possible and requires a little bit of scripting so I am saving it for the next post 😉

Add colors to TabPy console output

Let’s brighten the day, shall we?

In one of my previous posts, I explained how logging can be configured for TabPy: levels, the format of the message, where it is sent/stored, etc. Read here for more detail – How to Configure Logging in TabPy?

I also mentioned there is number of handlers from provided with Python (console, file, and others). But it is also possible to use third party or customized handlers. With this post, I am going to show how you can make console logging colorful with third-party formatter.

First, we need a formatter. You can choose any, I for the demonstration purposes picked up colorlog (https://pypi.org/project/colorlog/). The most important thing you need to pay attention to is how the formatter messages are formatted… Yes, you’ll need to define the format for the formatter. For the one I chose documentation for the format arguments is on the PyPi and GitHub (https://github.com/borntyping/python-colorlog) pages for the package.

Let’s install the package:

pip install colorlog

Next, we need a configuration file (additional reading – TabPy: modifying default configuration):

[loggers]
keys=root

[logger_root]
level=INFO
handlers=console

[handlers]
keys=console

[formatters]
keys=console

[handler_console]
class=StreamHandler
level=INFO
formatter=console
args=(sys.stderr,)

[formatter_console]
class=colorlog.ColoredFormatter
format=%(asctime)s [%(bold)s%(log_color)s%(levelname)-8s%(reset)s] %(log_color)s%(message)s%(reset)s
datefmt=%y/%m/%d %H:%M:%S

In the file everything till line 20 is standard: define loggers, handlers, and formatters. And now with the only formatter defined we want to use formatter from the package previously installed. The line class=colorlog.ColoredFormatter tells Python logger to use specified formatter (ColoredFormatter) from colorlog package.

For the format parameter which defines what will be in a logged message we use formatter specific arguments: %(bold) makes text bold, %(log_color) sets the color for following text, and %(reset) changes text attributes to default. Again – for any other formatter you choose to use the arguments list most likely will be different.

Running TabPy with the config and querying it will look something like this:

How to Configure Logging in TabPy?

TabPy logs are useful for investigating issues, learning about user activities, how TabPy is used and so on. In my previous post TabPy: modifying default configuration I showed how to change TabPy settings. Logging for TabPy is configured in a similar way and I am going to show and explain some details for how to configure logging.

For the most recent and complete documentation about Python logger configuration, read this documentation page – https://docs.python.org/3/howto/logging.html.

In TabPy config file logger (or rather loggers) are configured with a few sections. A logger itself associated with a logger handler which in its turn depends on a logger formatter:

  • Loggers are used in Python code to initiate logging a message. Based on the severity logger passes the message to corresponding handlers.
  • Handlers are dispatching log messages to the handler’s specified destination. There are handlers for the console, files, etc.
  • Formatters specify how a logged message should look like: order and format of the message properties.

For logger configuration file format read the documentation at https://docs.python.org/3/library/logging.config.html#configuration-file-format.

Following is the example of how to configure logging.

First, section to look at is [loggers] where names of loggers are listed (TabPy will log with all of them). The following example specifies 2 loggers:

[loggers]
keys=root,fileLogger

NOTE: there have to be a logger (it can be the only logger) named “root” in the list of loggers.

Next is the [handlers] section which lists handlers:

[handlers]
keys=consoleHandler,fileHandler

And finally formatters section [formatter] lists all the formatters (not all of them have to be used):

[formatters]
keys=consoleFormatter,fileFormatter

Now for each logger in [logger] section there is [logger_<name>] section with settings for a logger:

[logger_root]
level=WARNING
handlers=consoleHandler

[logger_fileLogger]
level=DEBUG
handlers=fileHandler
propgate=1
qualname=consoleLogger

As you can see from the example above for each logger severity level is specified which means only messages with specified severity of higher. The level can be one of DEBUG, INFO, WARNING, ERROR, CRITICAL or NOTSET (all messages will be logged).

Handlers for a logger are listed with handlers parameter. It is possible to have more than one handler for a logger.

For non-root loggers properties propgate and qualname need to be set. The first one specifies if messages need to be propagated to a handler higher up and is set to 1 or 0. And qualname sets the name for the logger so it can be referenced from Python code.

For each handler there is [handler_<name>] section:

[handler_consoleHandler]
class=StreamHandler
level=WARNING
formatter=consoleFormatter
args=(sys.stdout,)

[handler_fileHandler]
class=handlers.RotatingFileHandler
level=DEBUG
formatter=fileFormatter
args=('tabpy_log.log', 'a', 1000000, 5)

For each formatter there is level parameter which is configured in the same way as for a logger.

With class parameter a Python class which implements a handler is specified (more details below). It is possible to use the same class for different handlers. As an example, you can have one large log file where entries are appended and the same messages logged to date specific log files.

Formatter for logged messages is set with formatter parameter. Again – the same formatter can be used with multiple handlers.

And args parameter provides logger specific parameters.

Handler classes available with Python are listed at https://docs.python.org/3/library/logging.handlers.html#module-logging.handlers, but it is possible to use any custom handlers (e.g. for colorful output in the console) with other packages installed in the Python environment. Some useful handlers are:

  • StreamHandler sends logging to a stream (e.g. console).
  • FileHandler appends messages to a file.
  • NullHandler does not log anything.
  • RotatingFileHandler logs to a file until log file size limit is reached and then creates a new file and logs to it. The handler is used in the example above and it will create a new log file when the current one reaches 1000000 bytes in size. The current file name is always tabpy_log.log, previous log file will be named tabpy_log.log.1 and so on till tabpy_log.log.5.
  • TimedRotatingFileHandler is similar to RotatingFileHandler but creates a new file after the specified time interval.
  • HTTPHandler sends messages to a web server with GET or POST command.

For each formatter printf-style string formatting string (documentation is here – https://docs.python.org/3/library/stdtypes.html#old-string-formatting) specifies how the format message is built. In the format string additional log objects can be used (list of the log objects is here – https://docs.python.org/3/library/logging.html#logging.LogRecord):

[formatter_consoleFormatter]
format=%(asctime)s: %(message)s
datefmt=%H:%M:%S

[formatter_fileFormatter]
format=%(asctime)s [%(levelname)s] (%(filename)s:%(module)s:%(lineno)d): %(message)s
datefmt=%Y-%m-%d,%H:%M:%S

In this example console formatter will output all the messages with preceding timestamp and for file logs there will be date-time stamp, severity of the message, where in the code it was logged from and the message itself.

Now the whole config file (I have it on my machine saved as c:\demo\tabpy\tabpy.conf:

[loggers]
keys=root,fileLogger

[formatters]
keys=consoleFormatter,fileFormatter

[handlers]
keys=consoleHandler,fileHandler

[logger_root]
level=WARNING
handlers=consoleHandler

[logger_fileLogger]
level=DEBUG
handlers=fileHandler
propgate=1
qualname=consoleLogger

[handler_consoleHandler]
class=StreamHandler
level=WARNING
formatter=consoleFormatter
args=(sys.stdout,)

[handler_fileHandler]
class=handlers.RotatingFileHandler
level=DEBUG
formatter=fileFormatter
args=('tabpy_log.log', 'a', 1000000, 5)

[formatter_consoleFormatter]
format=%(asctime)s: %(message)s
datefmt=%H:%M:%S

[formatter_fileFormatter]
format=%(asctime)s [%(levelname)s] (%(filename)s:%(module)s:%(lineno)d): %(message)s
datefmt=%Y-%m-%d,%H:%M:%S

Starting TabPy with the config:

tabpy --config c:\demo\tabpy\tabpy.conf

After running a few requests against my local TabPy instance this is what I see in the console:

15:19:37: Responding with status=404, message="Unknown endpoint", info="Endpoint olek_add is not found"
15:19:37: 404 GET /endpoints/olek_add (::1) 5.03ms

And for the same TabPy there’s much much more information in tabpy_log.log file:

2019-12-04,15:14:54 [DEBUG] (app.py:app:215): Parameter port set to "9004" from default value
2019-12-04,15:14:54 [DEBUG] (app.py:app:215): Parameter server_version set to "0.8.9" from default value
2019-12-04,15:14:54 [DEBUG] (app.py:app:215): Parameter evaluate_timeout set to "30" from default value
...
2019-12-04,15:15:17 [INFO] (app.py:app:110): Initializing TabPy...
...
2019-12-04,15:15:17 [INFO] (app.py:app:93): Web service listening on port 9004

How to configure TabPy with authentication and use it in Tableau

Intro

In this post, I will demonstrate how to configure TabPy to require username and password, how to manage users for TabPy and how to connect from Tableau (both Desktop and Server) to TabPy with specifying credentials.

User Management for TabPy

After TabPy is installed (read Tableau Installation Instructions for how to install it) you can use tabpy-user command-line utility for adding and updating TabPy user accounts.

The utility itself supports a set of parameters such as a path to passwords file, operation, username and so on. Run tabpy-user -h to see all the parameters.

Adding a User

To add a user specify a username, a path to passwords file, password and add operation, e.g.:

c:\TabPy>tabpy-user add -u alice -f c:\TabPy\tabpypwd.txt -p P@ssw0rd
Parsing passwords file c:\TabPy\tabpypwd.txt...
Passwords file c:\TabPy\tabpypwd.txt not found
Adding username "alice"
Adding username "alice" with password "P@ssw0rd"...
Added username "alice" with password "P@ssw0rd"

In the example above the user alice with password P@ssw0rd was added to file c:\TabPy\tabpypwd.txt.

You can also let the utility generate a password for you simply skipping -p <Password> parameter:

c:\TabPy>tabpy-user add -u bob -f c:\TabPy\tabpypwd.txt
Parsing passwords file c:\TabPy\tabpypwd.txt...
Found username alice
Authentication is enabled
Generated password: ")7!f}dA_K=hrF7{x"
Adding username "bob"
Adding username "bob" with password ")7!f}dA_K=hrF7{x"...
Added username "bob" with password ")7!f}dA_K=hrF7{x"

In the example above new user bob was added to the same password file with password )7!f}dA_K=hrF7{x.

Updating User Password

It is possible to update the password for a user with update command, e.g.:

c:\TabPy>tabpy-user update -u alice -f c:\TabPy\tabpypwd.txt -p Secret_D0nt_Te11
Parsing passwords file c:\TabPy\tabpypwd.txt...
Found username alice
Found username bob
Authentication is enabled
Updating username "alice"
Updating username "alice" password  to "Secret_D0nt_Te11"

In this example alice‘s password was changed to Secret_D0nt_Te11.

What’s Inside Passwords File?

The password file is just a text file with user names and hashed passwords on each line. If you open the file you will see something like this:

alice edb6473a71775f48538c1cee15dc41269302b06b79260c70ce149d1b24a4192f764570702d5449fa2712c0a99d0db9216c1a452f07a3a3b44dca1b491cd7d516
bob 7716853bdc91132fe4bef86adaac0ae6fa9cf474c5b075e89880fcd21834d2bb16266eb65d0be0a8faa2ee48342708350b95af4af3caebbb8044f59341fcfab6

Those long codes are actually the hashes for the passwords. Instead of keeping passwords in plain text or encrypted form TabPy uses hashes. What it does is makes it impossible (rather incredibly expensive) to recover passwords from those hashes. If you wonder how the passwords are hashed – at the moment TabPy uses PBKDF2 method with 10000 iterations (https://en.wikipedia.org/wiki/PBKDF2).

Deleting a User

Since the password file is just a text file you can delete a user with any text editor simply deleting the whole line with the user name in it.

Configuring TabPy with Authentication

Now when you have the passwords file you can point TabPy to it so it knows to require credentials with all the requests to serve.

NOTE: any changes for the password file do not affect any running instances of TabPy – you will need to restart TabPy for the changes to take effect.

In previous post TabPy: modifying default configuration it was shown how to changes some (or all) TabPy configuration parameters with a config file. Let’s create a config file to turn on authentication as well. I am storing the following configuration in c:\TabPy\tabpy_auth.conf:

[TabPy]
TABPY_PWD_FILE = c:\TabPy\tabpypwd.txt

As you can see the only configuration parameter I am modifying there is the password file path. In real-life scenarios, you will have logger settings, port, timeout and any other of the parameters documented at TabPy Custom Settings page.

Now let’s start TabPy with the config:

c:\TabPy>tabpy --config c:\TabPy\tabpy_auth.conf
...
DEBUG:tabpy.tabpy_server.app.app:Parameter TABPY_PWD_FILE set to "c:\TabPy\tabpypwd.txt" from config file or environment variable
INFO:tabpy.tabpy_server.app.util:Parsing passwords file c:\TabPy\tabpypwd.txt...
DEBUG:tabpy.tabpy_server.app.util:Found username alice
DEBUG:tabpy.tabpy_server.app.util:Found username bob
INFO:tabpy.tabpy_server.app.util:Authentication is enabled
...
INFO:tabpy.tabpy_server.app.app:Web service listening on port 9004

TabPy is running with authentication on!

Connecting from Tableau

For Tableau to communicate with TabPy when credentials are required you need to configure the product with username and password. As mentioned at TabPy Authentication page basic authentication is used at the moment (https://en.wikipedia.org/wiki/Basic_access_authentication) which means username (login) and password sent with each HTTP request to TabPy. This is why it is highly recommended to use a secured communication channel rather than plain text. For how to configure secure connection read Configuring HTTP vs HTTPS documentation page.

Tableau Desktop

For Tableau Desktop go to the main menu, Help, Settings and Performance, Manage External Service Connection. The screenshots below are for Tableau 2019.4.2:

Set connection type to be TabPy/External API, enter Server (host) and Port for your TabPy instance (localhost and 9004 on the screenshot below), set check mark for Sign with username and password and enter credentials for a user:

To confirm the credentials are valid click Test Connection button and popup message with confirming success (or failure details) will show:

Tableau Server

To configure Tableau Server connection to TabPy with authentication follow instructions at TSM Security page. At the moment this post is being written the latest available version of Tableau Server is 2019.4.2 and the steps will be setting up a connection and applying the changes:

c:\user\admin>tsm security vizql-extsvc-ssl enable --connection-type tabpy --extsvc-host my_tabpy_server --extsvc-port 9004 --extsvc-username alice --extsvc-password Secret_D0nt_Te11
...

c:\user\admin>tsm pending-changes apply

TabPy: modifying default configuration

Where to look at?

It is very easy to install (with pip install tabpy command) TabPy and start (with tabpy command) TabPy instance… but what if you need to make changes is some configuration settings? You may want to use a different port because the default 9004 is in use by some other application, or you may need to run multiple TabPy instances on the same machine for some reason. Or you want to change the level of logging for it to be more/less verbose or location of the log file.

The first thing to look at is the documentation page for how to customize TabPy settings. As you can see there are some settings which names start with TABPY_ prefix – those can be overwritten with environment variables.

Modifying individual settings with environment variables

If you only need to modify one or two parameters the simplest way to do so is to set the value for the parameter by setting the environment variable with the same name. Example for Windows for how to modify default TabPy port:

(Python 3.6) C:\Users\oleks_000>set TABPY_PORT=6311

(Python 3.6) C:\Users\oleks_000>tabpy
2020-01-20,16:45:59 [DEBUG] (app.py:app:207): Parameter port set to "6311" from config file or environment variable
...
2020-01-20,16:45:59 [INFO] (app.py:app:93): Web service listening on port 6311

For macOS and Linux use export TABPY_PORT=6311 command instead of set command in the example above.

The environment variable set in the way shown above won’t keep its value between terminal sessions – as soon as the terminal is closed not just the value of the variable but the variable itself won’t exist anymore.

This is one reason to use a configuration file to preserve configuration settings. Another reason is in the file you can modify multiple settings at once and even have set of files for different configurations.

Starting TabPy with a configuration file

On TabPy documentation page mentioned above (https://github.com/tableau/TabPy/blob/master/docs/server-config.md#custom-settings) there is an example of a configuration file. Copy it to some local file and edit as needed.

In the file, you only need to specify settings that have to be different from defaults. Here’s the file I use for the next example:

[TabPy]
TABPY_PORT = 6311
TABPY_MAX_REQUEST_SIZE_MB = 250
TABPY_EVALUATE_TIMEOUT = 60

[loggers]
keys=root

[handlers]
keys=rootHandler

[formatters]
keys=rootFormatter

[logger_root]
level=INFO
handlers=rootHandler
qualname=root
propagete=0

[handler_rootHandler]
class=StreamHandler
level=DEBUG
formatter=rootFormatter
args=(sys.stdout,)

[formatter_rootFormatter]
format=%(asctime)s [%(levelname)s] (%(filename)s:%(module)s:%(lineno)d): %(message)s
datefmt=%Y-%m-%d,%H:%M:%S

I stored the file as c:\tabpy\demo.conf and now can use it when starting TabPy with specifying custom configuration using --config command-line parameter :

(Python 3.6) C:\Users\oleks_000>tabpy --config c:\TabPy\demo.conf
2020-01-20,17:02:12 [INFO] (app.py:app:280): Loading state from state file c:\users\oleks_000\appdata\local\conda\conda\envs\python 3.6\lib\site-packages\tabpy\tabpy_server\state.ini
2020-01-20,17:02:12 [INFO] (app.py:app:311): Password file is not specified: Authentication is not enabled
2020-01-20,17:02:12 [INFO] (app.py:app:327): Call context logging is disabled
2020-01-20,17:02:12 [INFO] (app.py:app:110): Initializing TabPy...
2020-01-20,17:02:12 [INFO] (callbacks.py:callbacks:42): Initializing TabPy Server...
2020-01-20,17:02:12 [INFO] (app.py:app:113): Done initializing TabPy.
2020-01-20,17:02:12 [INFO] (app.py:app:67): Setting max request size to 262144000 bytes
2020-01-20,17:02:12 [INFO] (callbacks.py:callbacks:62): Initializing models...
2020-01-20,17:02:12 [INFO] (app.py:app:93): Web service listening on port 6311

What are those logger settings I see in the configuration file?

Short answer – those are Python logger settings documentation for which you can find at Python logger documentation page. With those setting you can control what is logged (how verbose is the logging), where the log entries are stored (console, file, etc.), in what format (what is in the logged message), how to format timestamp for a message and so on.

This post explains some details about logger configuration for TabPy – How to Configure Logging in TabPy? Another post shows how to use colors for console logging – Add colors to TabPy console output.

And here is post explaining how to configure authentication for TabPy – How to configure TabPy with authentication and use it in Tableau.