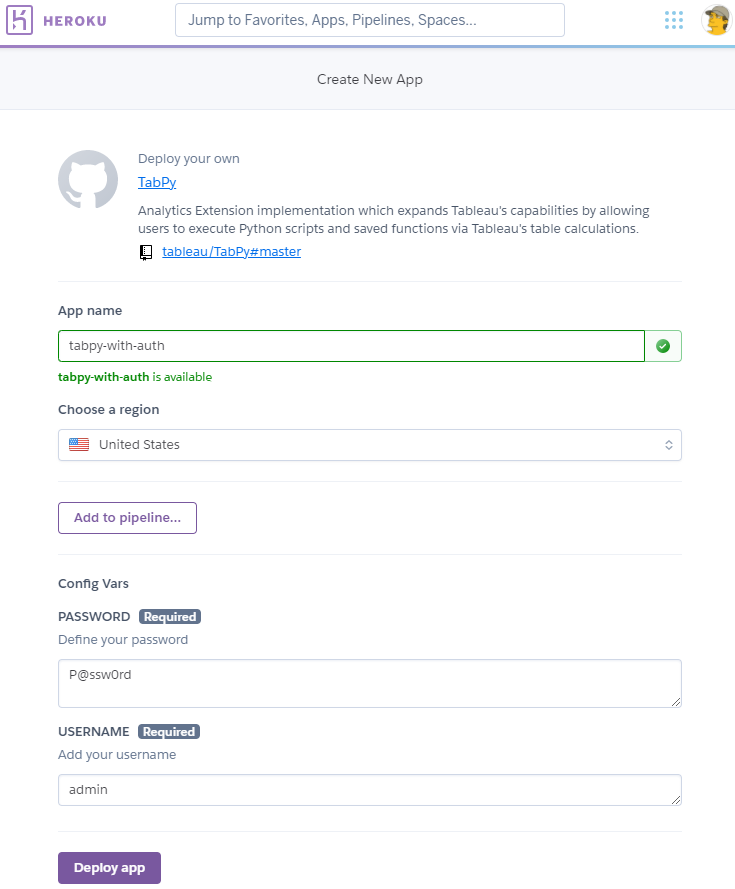
Previously TabPy repo on github (https://github.com/tableau/TabPy) provided Deploy to Heroku button which allows to deploy TabPy in just a few clicks. However, deployed new instance won’t have authentication configured. And having both authentication and SSL is a requirement for analytics extensions to be able for using by Tableau Online.
With the latest improvement now you can specify user name and password for the instance:
Another approach described in TabPy + Heroku = Tableau Online post and is useful for when you need to create your own flavor of TabPy – not only you can specify multiple users, but also can configure any other parameters. This approach requires a bit more work but gives a lot of flexibility in configuring TabPy for you needs. And with your own modifications you can deploy your own version of TabPy on Heroku the same way just in a few clicks.
To install or update to the latest version as usual run
pip install --upgrade tabpy
The release includes fixes for authentication:
Fixed bug for scripts with tabpy.query(...) calls for when authentication is configured for TabPy.
Fixed bug for TabPy reporting 500 error instead of 401 when it runs without the attached console.
Improved authentication security (this is breaking change) – now TabPy returns authentication error when credentials are provided, but it is not configured for it.
You can update your TabPy with the following command (you’ll need to stop all running TabPy instances first):
pip install --upgrade tabpy
New release main improvement is for /info method (https://tableau.github.io/TabPy/docs/server-rest.html#get-info) – now it checks for credentials to be provided if TabPy is configured for authentication. The improvement won’t affect any older Tableau Desktop or Tableau Server versions which already had support for TabPy authentication.
In this post, I will demonstrate how to configure TabPy to require username and password, how to manage users for TabPy and how to connect from Tableau (both Desktop and Server) to TabPy with specifying credentials.
User Management for TabPy
After TabPy is installed (read Tableau Installation Instructions for how to install it) you can use tabpy-user command-line utility for adding and updating TabPy user accounts.
The utility itself supports a set of parameters such as a path to passwords file, operation, username and so on. Run tabpy-user -h to see all the parameters.
Adding a User
To add a user specify a username, a path to passwords file, password and add operation, e.g.:
c:\TabPy>tabpy-user add -u alice -f c:\TabPy\tabpypwd.txt -p P@ssw0rd
Parsing passwords file c:\TabPy\tabpypwd.txt...
Passwords file c:\TabPy\tabpypwd.txt not found
Adding username "alice"
Adding username "alice" with password "P@ssw0rd"...
Added username "alice" with password "P@ssw0rd"
In the example above the user alice with password P@ssw0rd was added to file c:\TabPy\tabpypwd.txt.
You can also let the utility generate a password for you simply skipping -p <Password> parameter:
c:\TabPy>tabpy-user add -u bob -f c:\TabPy\tabpypwd.txt
Parsing passwords file c:\TabPy\tabpypwd.txt...
Found username alice
Authentication is enabled
Generated password: ")7!f}dA_K=hrF7{x"
Adding username "bob"
Adding username "bob" with password ")7!f}dA_K=hrF7{x"...
Added username "bob" with password ")7!f}dA_K=hrF7{x"
In the example above new user bob was added to the same password file with password )7!f}dA_K=hrF7{x.
Updating User Password
It is possible to update the password for a user with update command, e.g.:
c:\TabPy>tabpy-user update -u alice -f c:\TabPy\tabpypwd.txt -p Secret_D0nt_Te11
Parsing passwords file c:\TabPy\tabpypwd.txt...
Found username alice
Found username bob
Authentication is enabled
Updating username "alice"
Updating username "alice" password  to "Secret_D0nt_Te11"
In this example alice‘s password was changed to Secret_D0nt_Te11.
What’s Inside Passwords File?
The password file is just a text file with user names and hashed passwords on each line. If you open the file you will see something like this:
alice edb6473a71775f48538c1cee15dc41269302b06b79260c70ce149d1b24a4192f764570702d5449fa2712c0a99d0db9216c1a452f07a3a3b44dca1b491cd7d516
bob 7716853bdc91132fe4bef86adaac0ae6fa9cf474c5b075e89880fcd21834d2bb16266eb65d0be0a8faa2ee48342708350b95af4af3caebbb8044f59341fcfab6
Those long codes are actually the hashes for the passwords. Instead of keeping passwords in plain text or encrypted form TabPy uses hashes. What it does is makes it impossible (rather incredibly expensive) to recover passwords from those hashes. If you wonder how the passwords are hashed – at the moment TabPy uses PBKDF2 method with 10000 iterations (https://en.wikipedia.org/wiki/PBKDF2).
Deleting a User
Since the password file is just a text file you can delete a user with any text editor simply deleting the whole line with the user name in it.
Configuring TabPy with Authentication
Now when you have the passwords file you can point TabPy to it so it knows to require credentials with all the requests to serve.
NOTE: any changes for the password file do not affect any running instances of TabPy – you will need to restart TabPy for the changes to take effect.
In previous post TabPy: modifying default configuration it was shown how to changes some (or all) TabPy configuration parameters with a config file. Let’s create a config file to turn on authentication as well. I am storing the following configuration in c:\TabPy\tabpy_auth.conf:
[TabPy]
TABPY_PWD_FILE = c:\TabPy\tabpypwd.txt
As you can see the only configuration parameter I am modifying there is the password file path. In real-life scenarios, you will have logger settings, port, timeout and any other of the parameters documented at TabPy Custom Settings page.
Now let’s start TabPy with the config:
c:\TabPy>tabpy --config c:\TabPy\tabpy_auth.conf
...
DEBUG:tabpy.tabpy_server.app.app:Parameter TABPY_PWD_FILE set to "c:\TabPy\tabpypwd.txt" from config file or environment variable
INFO:tabpy.tabpy_server.app.util:Parsing passwords file c:\TabPy\tabpypwd.txt...
DEBUG:tabpy.tabpy_server.app.util:Found username alice
DEBUG:tabpy.tabpy_server.app.util:Found username bob
INFO:tabpy.tabpy_server.app.util:Authentication is enabled
...
INFO:tabpy.tabpy_server.app.app:Web service listening on port 9004
TabPy is running with authentication on!
Connecting from Tableau
For Tableau to communicate with TabPy when credentials are required you need to configure the product with username and password. As mentioned at TabPy Authentication page basic authentication is used at the moment (https://en.wikipedia.org/wiki/Basic_access_authentication) which means username (login) and password sent with each HTTP request to TabPy. This is why it is highly recommended to use a secured communication channel rather than plain text. For how to configure secure connection read Configuring HTTP vs HTTPS documentation page.
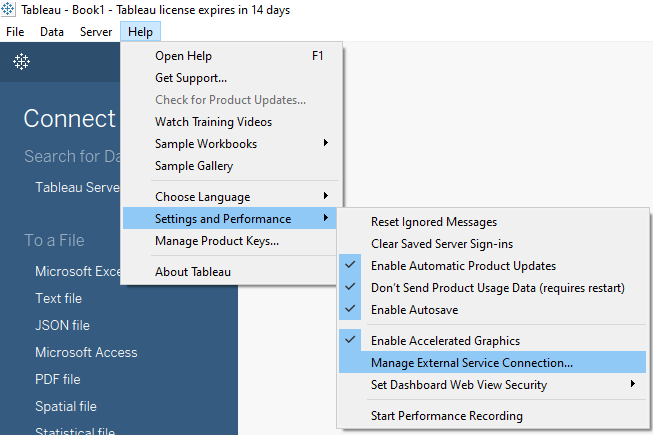
Tableau Desktop
For Tableau Desktop go to the main menu, Help, Settings and Performance, Manage External Service Connection. The screenshots below are for Tableau 2019.4.2:
Set connection type to be TabPy/External API, enter Server (host) and Port for your TabPy instance (localhost and 9004 on the screenshot below), set check mark for Sign with username and password and enter credentials for a user:
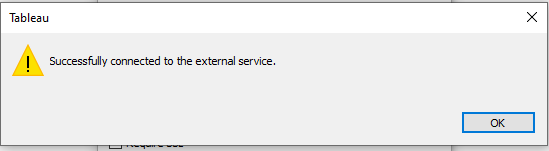
To confirm the credentials are valid click Test Connection button and popup message with confirming success (or failure details) will show:
Tableau Server
To configure Tableau Server connection to TabPy with authentication follow instructions at TSM Security page. At the moment this post is being written the latest available version of Tableau Server is 2019.4.2 and the steps will be setting up a connection and applying the changes:
You can call the API from the command line using curl or similar tool, e.g.:
c:\Users\TabPyUser>curl -X POST http://my-tabpy-server:9004/evaluate -d "{\"data\":{\"_arg1\":[1, 2, 3],\"_arg2\":[3, -1, 5]},\"script\":\"return [x + y for x, y in zip(_arg1, _arg2)]\"}"
[4, 1, 8]
But as you can see it is a lot of typing, hard to read and impossible to see if anything is wrong in the address, headers, request body and so on.
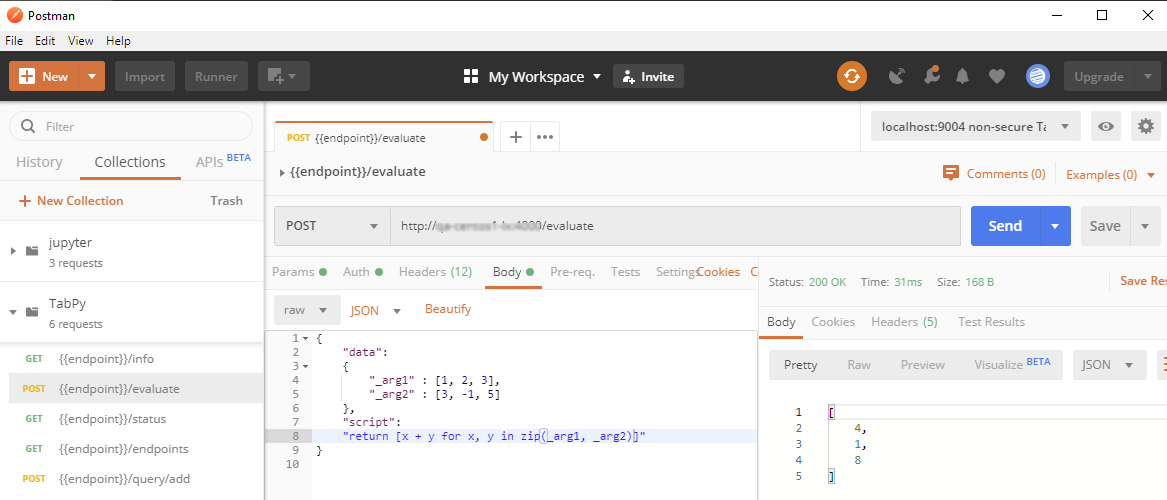
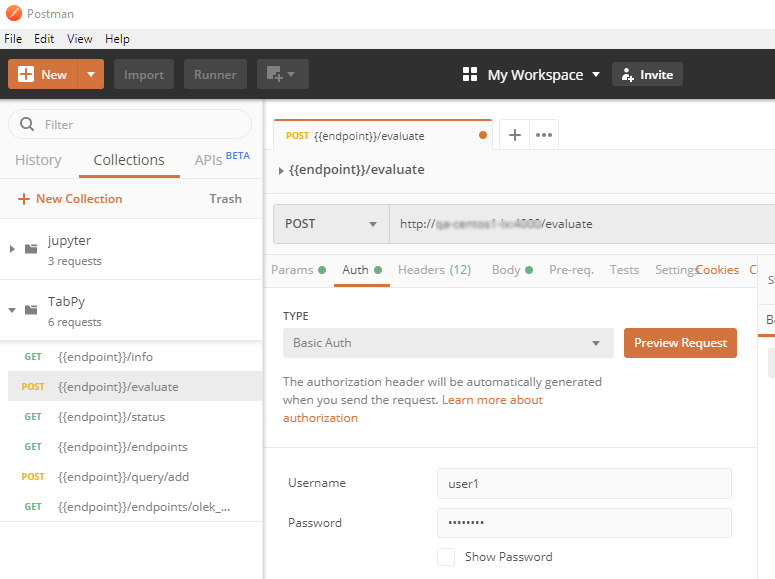
Postman is the tool created just for the purpose of invoking REST API. And TabPy has Postman file in the repository with all the supported methods.
After loading the file open TabPy collection and click on a method you want to exercise. Replace {{endpoint}} variable with your TabPy server name and port or define the variable to reuse it and click Send button.
Note some methods are GET and some are POST – for POST methods you can specify request body as shown on the screenshot above.
If your TabPy is configured for secure connection simply use https:// instead of http:// in the URL.