How to run TabPy as Windows Service

People ask this question in different ways:

  • How do I make TabPy to start automatically?
  • How can I run TabPy in background?
  • How can I run TabPy as if it was a service?

Answer to these questions are different depending on your OS and can even be different for different versions of the same OS.

In this post I am showing the simplest way to make TabPy something like a Windows service – which means it starts automatically and runs in background. For the following steps, I assume you have TabPy environment configured in Anaconda (read https://tabscifi.golovatyi.info/category/anaconda/ for more examples and how-to’s for using Anaconda with analytics extensions).

With my Anaconda I have tabpy_demo environment where TabPy package is installed:

Next, I created c:\demo\TabPy_as_a_service folder with the simple config file in it:

[TabPy]
TABPY_PORT = 9004
[loggers]
keys=root
[handlers]
keys=rootHandler
[formatters]
keys=rootFormatter
[logger_root]
level=DEBUG
handlers=rootHandler
qualname=root
propagete=0
[handler_rootHandler]
class=handlers.RotatingFileHandler
level=DEBUG
formatter=rootFormatter
args=('tabpy_log.log', 'a', 1000000, 5)
[formatter_rootFormatter]
format=%(asctime)s %(levelname)ss:%(lineno)d): %(message)s
datefmt=%Y-%m-%d,%H:%M:%S

For more information about custom TabPy config consider reading posts at https://tabscifi.golovatyi.info/category/tabpy-configuration/.

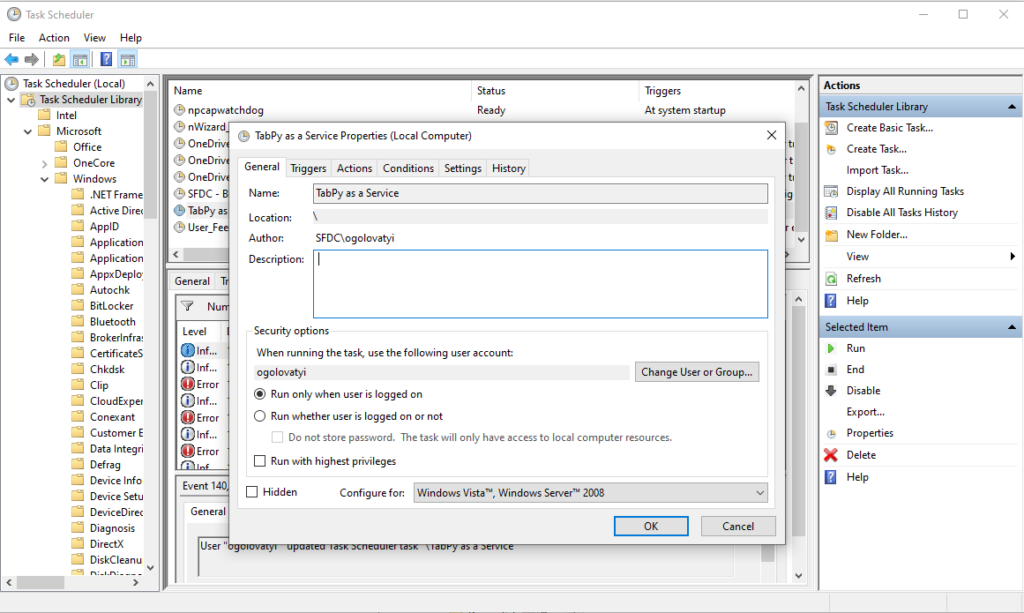
Now let’s create a task with Task Scheduler (Start->Task Scheduler). In Task Scheduler Library click Create Task… on Actions pane on the right. In the task dialog specify the task name (I use “TabPy as a Service” in this example), and choose if you want the task to run with specific account.
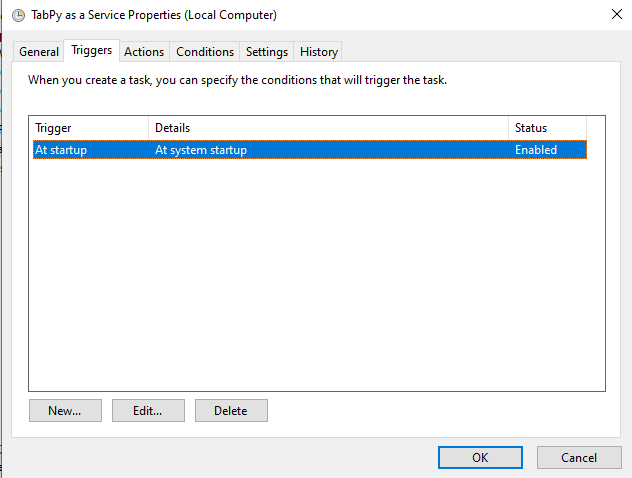
On Triggers tab click New… and specify At startup – now the task runs automatically at system startup.
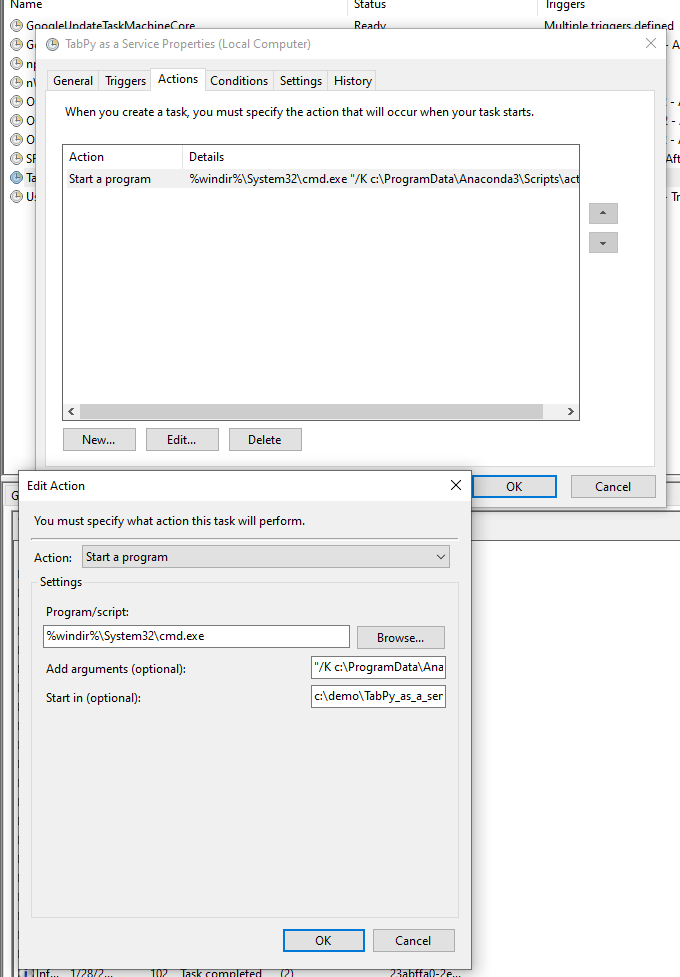
On Actions tab add new action Start a program and use the following parameters:

  • For Program/script use %windir%\System32\cmd.exe.
  • For arguments at Add arguments enter `”/K c:\ProgramData\Anaconda3\Scripts\activate.bat tabpy_demo && tabpy –config tabpy.conf”`. More about the string below.
  • For Start in specify folder you have your config file in. The same folder will have TabPy logs in my case.
The arguments string above means:

  • /K tells cmd to run the command and continue (documentation for cmd is here – https://docs.microsoft.com/en-us/windows-server/administration/windows-commands/cmd).
  • c:\ProgramData\Anaconda3\Scripts\activate.bat tabpy_demo activates Anaconda environment tabpy_demo. For you this part will be different: Anaconda can be installed in a different folder and TabPy environment will have a different name.
  • tabpy --config tabpy.conf starts TabPy with the custom configuration file in c:\demo\TabPy_as_a_service folder specifies as Start in folder.

On Conditions and Settings tabs change parameters as needed.

Now you can test the task – click Run action on Actions pane. If the task was configured properly you’ll see TabPy is running.

Log files for TabPy can be found in the same c:\demo\TabPy_as_a_service folder where config file is:
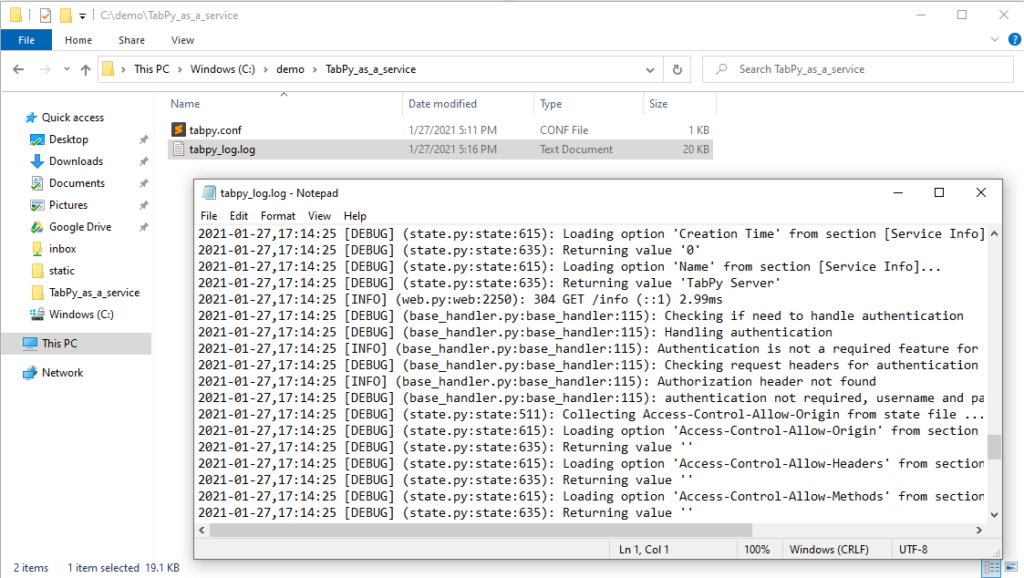
Now we have TabPy scheduled to start on a system start up.

One question remains – how can I make cmd window go away? It is possible and requires a little bit of scripting so I am saving it for the next post 😉

How to run TabPy with Anaconda on Linux

What Anaconda is can be explained in many ways depending on how and what you use is for. In the case of TabPy Anaconda serves as Python environments manager which allows having different Python environments (different versions of Python with a different set of packages) on the same machine. To learn more about Anaconda and where it can be used to start at https://www.anaconda.com/.

First question to ask is why you may need to use Python environments. There are many reasons. Couple of the most important are:

  • Your OS may have old version of “system wide” Python (e.g. Python 2.7) and it is not easy (or not possible at all) to update it without breaking something, and
  • You may want to isolate TabPy environment with packages it needs from your other environment (development, training models, etc.), or
  • You may want to have multiple independent TabPy instances each with their own set of packages awailable.

To manage Python environments Anaconda is not the only option, you can use Python virtualenv tools for example – https://virtualenv.pypa.io/en/latest/. However Anaconda has some advantages like nice UI app to manages environments and packages, saving/restoring/sharing enviroments, support for R environments, etc.

And when for Windows and Mac you can use UI app in many cases for Linux GUI is not an option. In other words you will need to use command line. And this is what rest of this post shows how to do.

After login to a Linux machine, you need to download Anaconda installer from https://www.anaconda.com/distribution/. The following commands assume you are in your home folder (run cd ~ to navigate to your home folder). On the Anaconda distribution page find the link for the latest version for Linux and run the following command:

wget https://repo.anaconda.com/archive/Anaconda3-2020.02-Linux-x86_64.sh

Now when you have the installer in your home folder run it:

bash Anaconda3-2020.02-Linux-x86_64.sh

When the installer finishes add path to the Anaconda to the environment variable (this assumes bash is your Linux shell):

echo 'export PATH="~/anaconda3/bin:$PATH"' >> ~/.bashrc

In the command above we add anaconda3 subfolder bin from the user home folder to environment variable PATH so anaconda commands can be found regardless of what is the current folder. If you installed Anaconda in a different location the command need to be modified properly.

Now let’s restart shell (or you can unlog and log in again):

source ~/.bashrc

Next let’s update Anaconda:

conda update conda

In the command above conda is the tool which will let us perform different Anaconda operations.

Next step is to create new environment for TabPy:

conda create --name TabPy python=3.7

What happens in the command above is new environment with name TabPy is created and it has Python 3.7 available for it.

You can have as many environments as you need with different or the same Python versions. As all of them are isolated and do not interfere it is possible to have different sets of packages or the same packages of different versions in them.

Now we can activate the environment:

conda activate TabPy

If the command succeeds you’ll the command prompt is updated to have the environment name in it.

And now you can install TabPy and other packages:

python -m pip install --upgrade
pip install tabpy
tabpy

To exit from the environment run deactivate command:

conda deactivate

For how to configure TabPy read https://tabscifi.golovatyi.info/2020/01/tabpy-modifying-default-configuration/.